

If you have accidentally deleted a photo or photo album or erased everything from your gallery, it can be a disappointing ordeal. This is true if you have a lot of precious photos of important events on your Android device that you failed to back up.
In such cases, you need an efficient and dependable Android photo recovery tool to restore your photos. You might find a wide selection of these tools available but one that stands out from the rest is FoneDog Android Data Recovery. If you are in search for the ideal tool, you should take a close look on this review on FoneDog’s Android Data Recovery.
What is the FoneDog Android Data Recovery?
The FoneDog Android Data Recovery is a program specially designed to restore lost data on any Android device such as messages, contacts, videos, photos and many more. If you accidentally deleted a single photo or an entire album or erased your photo gallery, you need this useful tool by FoneDog.
This Android photo recovery software boasts an intuitive GUI that guides you throughout the recovery process which is an advantage for all users.
After connecting your Android device to your computer, you must enable USB debugging on your device. Simply choose the files that you want to restore. In your case, select the photo files that you want to retrieve from your Android device.
At this point, you can start the scanning process. Once complete, you can preview the photo files that you have chosen so that you can save those that are important. You can also indicate the output location in the “Preferences” window.
Overall, the tool is simple to use and the entire process is relatively straightforward.
How to Recover Lost Photos Using FoneDog Android Data Recovery
If you want to easily and efficiently recover photos from your Android device, using the Android photo recovery by FoneDog is the best choice.
If you want an overview on how this program works, let us take a close look at the steps on how to use the Android photo recovery tool.
Step 1. Download the FoneDog Toolkit – Android Data Recovery
Open the application and connect your Android device to your computer using a USB cable.
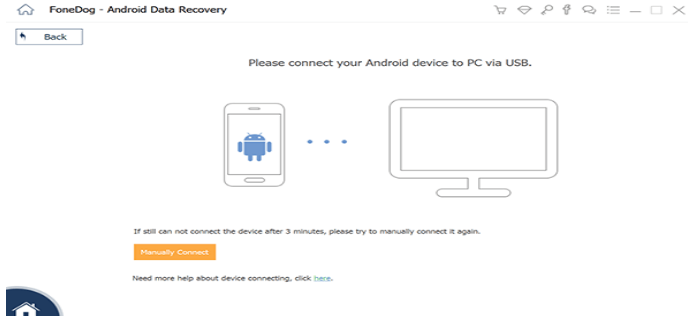
Step 2. Enable the USB Debugging option on your Android device.
If you cannot access the debugging on your device, FoneDog Android Data Recovery will ask to enable USB Debugging on your device.
If you have an Android 2.3 or earlier. Go to “Settings” > Click on “Applications” > Click on “Development” > Click on “USB Debugging”
If you have an Android 3.0 to 4.1. Go to “Settings” > Click on “Developer options” > Click on “USB Debugging”
If you have Android 4.2 or newer. Go to “Settings” > Click on “About Phone” > Click on “Build number” several times until a note saying “You are under developer mode” opens > Return to “Settings” > Click on “Developer options” > Select “USB Debugging”
Generally, USB Debugging is simply a mode that allows an Android device to connect to a computer via USB cable. Once you complete the steps above, click on “OK” on Android Data Recovery and click “OK” on your Android device.

Step 3. Choose the File Type to Scan
Once your Android device has been spotted by the Android photo recovery by FoneDog, it will provide all the types of data that can be recovered. By default, the application has selected all the data types. At this point, since you want to recover your photos, select the photo files to recover. Click on “Next” to start the scanning process.

Step 4. Choose the Files to Recover
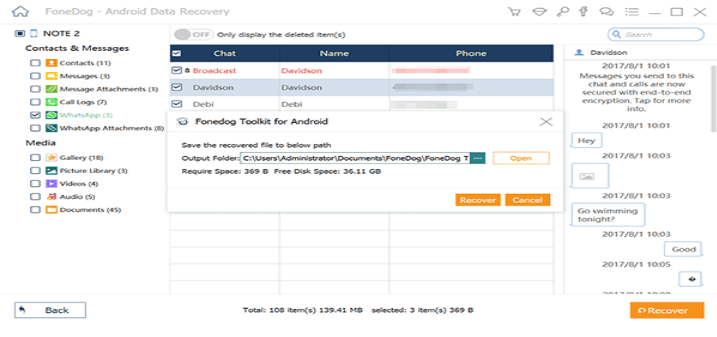
It will only take a few minutes for the scan to finish. Once it stops, the photo files will be listed in detail.
You can check the discovered data individually. You can mark down the elements that you want to retrieve and click on the “Recover” knob to save on your computer.
Generally, the length of the recovery process and the amount of data you can retrieve is based on the phone model, storage and if the deleted data is overwritten or not.
How to Recover Photos from the Cloud
Most cloud and photo applications offer to back up your photos in the background. If this option is turned on, chances are your photos are not deleted.
Deleting a photo from the gallery app of your Android device will not delete it from your cloud backup service. If you want to retrieve photos, simply log in to your cloud app and download again.
- If you are using Google Photos, simply open the image and select “Save to device” from the menu.
- For Dropbox, click “Export” > Save to device.
In case you removed the photo or image the cloud backup, you can retrieve it from there as well. Most of the cloud services utilize a recycle bin that enables users to retrieve any removed file within a certain period.
How to Avoid Losing Photos on Your Android Device
The ideal way to avoid losing your photos in the first place on your Android device is to perform a regular backup.
- Auto-upload to the cloud. This is the simplest option to avoid losing your photos. Most of these applications operate discreetly in the background and you can set them when to save your photos.
Aside from photos, your Android device stores a variety of important data. It is vital to back up everything on your Android device. If you regularly back up your device, you will always have a duplicate of all the data on your device and no longer risk losing anything again.
Frequently Asked Questions with the FoneDog Android Data Recovery
What should I do if my Android device is not recognized?
- If your Android device is not recognized, there are steps to follow:
- Uninstall the program first and download the latest program.
- Enable the USB debugging.
- Connect your Android device to your computer using a USB cable and click on the dropdown menu. Select the “MTP” mode or the “PTP” mode.
- Re-connect your USB cable to connect the device.
- Make sure that the correct driver is installed on your computer.
How long does it take to scan lost data?
Oftentimes, the FoneDog Android Data Recovery will take some time to scan the lost data. There are steps that you should follow:
- Step 1. If you have anti-virus software and Android management software, turn them off when running the FoneDog Android Data Recovery. There is no need to worry since the program is 100% clean and verified by McAfee and Norton.
- Step 2. Restart the program. After completing an analysis, click on the “Next” button. At this point, you can choose photo files to scan. You can lessen the scanning time by selecting only the photo files to recover from your Android device.
Conclusion
With the help of this review on the Android photo recovery tool by FoneDog, you will be guided on what to do to restore lost files on your Android device. Rest assured that any photo or photo albums that you accidentally deleted on your Android device will be restored efficiently. It is a must-have tool that can easily and capably restore not only your photos but also other important data on your device.


